Questions/fields
are the building blocks of forms. They let you collect information from
the people who fill out your form. Questions
can also include buttons and images. Each
form question type must exist in a row. Click on a question/field type
below for more information about that type.
The Button question type is commonly used for cause and effect. This means that when the form user clicks the button, they cause something to occur. Common form buttons include navigation buttons that save a user's progress as they go, save buttons to save progress, or submit buttons to finalize and send the form to the appropriate location. To add this functionality to buttons, you will need to set up rules for each button on the Rules tab of the button properties. Example
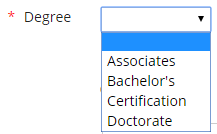
The CheckBox question type lets people select one or more answers from a list of choices. Example
A collection grid allows you to create one question and collect multiple pieces of information. For example, the online application template lets you collect information about several schools the applicant previously attended, but treats it as one piece of information. If you are sending information back to your desktop application, this means the information will be stored as one row.
Each collection grid should have one or more fields of information that it is collecting. Each field or question the grid is collecting is called a source question. All source questions, including the button that adds the information to the collection grid, are tied to a stored procedure. Example
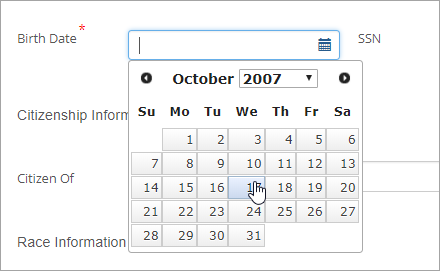
The Datepicker question type lets people choose a date and time using a pop-up calendar. Example
The Dropdown question type lets people select an answer from several choices. This question type is ideal for presenting a long list of options without cluttering your form. Example
The Essay question type lets people enter multiple lines of text. For example, people can respond to essay questions or enter open-ended comments/feedback. Example
The FileDownload question type lets you to upload a file that will be available for form users to download. You might want to create a printable version of the form and make it available as a PDF or attach a file that includes a list of regulations related to an application form. Example
The FileUpload question type lets form users upload and attach a file to their form entry. Example. For this question to work, the File Upload Root must be set on the question properties' settings tab.
The Hidden question type lets you add information to your form that only other form builders can see. You can include instructions for setting up the form. Example
The Image question lets you add a graphic such as a promotional image, picture of your campus, school logo, etc. to your form. You can upload an image from your local or network drive, or enter a link to an image. Example
The Label question is standalone text and typically used for providing instructions to form users. It does not collection information; it only displays information to the form user.
The Placeholder question doesn't collect information—it adds blank space to your form. Example
![]() |
If you add a blank row to add space, it will be removed from the form. The placeholder gives you the flexibility to add blank space. |
The RadioButton question lets people select one answer from several choices. Example
The Textbox question type lets people enter a single line of text. For example, people can enter responses to simple questions. Example
Add a Question/Field and Set up the Definition Properties
Log in to the campus portal as an administrator and access J1 FormFlow - Forms.
Click on the form you are working with.
Click Add Question. The Add Item window appears.
In the Unique ID field, enter an identifier for the checkbox.
From the Type drop-down pick list, select Checkbox.
In the Text field, enter and format the label you want to use to describe the checkbox.
Text is automatically added to the left of the checkbox. Use the Text Position options to move it to the top or right.
If you are grouping fields, enter the group name in the Group field. Each question being included in the group must have the same group name in this field.
If you are using a collection grid:
Select the grid you are associating the button with from the Grid drop-down.
Select the appropriate Grid Function from the drop-down.
Click Save.
Configure the Question/Field Settings
Log in to the campus portal as an administrator and access J1 FormFlow - Forms.
Click Manage Forms. The Manage Forms page appears.
Click on the form you are working with.
Click on the tab you want to work with.
Right-click on the question/field and select Properties. The Edit Item window appears.
Click the Settings tab. Below are all of the options that might be listed on the Settings tab. The options that display are dependent upon what question/field type you selected on the Definition tab. Below are all of the available setting options listed in alphabetical order.
Add Double Value to Final Balance: Select this checkbox if your question/field includes a value amount mapped to a selected Payment Profile, and you want to double the final balance amount the form user enters or selects. * It is recommended that you use the Balance Calculator to modify the final balance as this setting will eventually be discontinued.
Alignment: The question is automatically added to the left of the form page. Use the Alignment options to move it to the center or right.
Allowed Exentensions Separated by comma: To determine what file extensions your school will allow form users to upload, entered in the allowed extensions separated by commas. For example, you can enter ".docx, .pdf". This feature is used with the File Upload question.
Auto Complete Datasource: By selecting a datasource, this setting lets users begin typing their response in the textbox and populates a list of auto-complete options the user can select from.
Compare To: From the drop-down, select the Unique ID of the question that you would like to compare the user’s response to.
Date from Tag: Use this option to pre-populate a datepicker question with a particulate date using a literal string replacer. For example, you can create a @@BirthDate string replacer that selects the currently logged in user’s birthdate from the biograph_master table, and you could have it select that date by default in the datepicker by populating the Date from Tag setting with @@BirthDate.
Default Value: Enter in an option or particular text that you would like to be automatically selected, displayed, or entered when the form user accesses the form. Form users can update what is selected or entered. If the question is an essay type, you can also use @@ string replacers in this field. For filedownload questions, this text will appear as the link the users will click to download the file.
Display on: Select the checkboxes of the devices you would like this question/field to display on for form for.
Display Time: Use this option to determine if the datepicker question will show the time when the form user goes to pick a date.
File Header
File Name Format: define a name format for the file to be renamed when it is uploaded. If you do not enter anything here, the user's original file name is used. TIP: You can use @@string replacers or {} questions tags here. For example, entering {usf_LastName}_Essay would rename the uploaded file to 'Simpson_Essay.docx'. This setting is available for the File Upload question.
Font size: For essay questions, use the Font Size field to determine the font size of the text the user enters. TIP: Consider the height and width of your field. If you size them down and use a large font size, text may not appear.
Help Info Text: Enter additional information or brief instructions for form users. Help information is shown next to a help icon that shows your text when the user hovers over or clicks on it.
This option is only available to schools with a Candidate license. |
Hide On Load (Legacy): * This setting will soon be discontinued. To show/hide a question, use the Rules tab.
Include in Report Grid: Select this checkbox if you want the user’s response to be included in the form report summary table on the Report View.
Input control CSS classes: If you wish to use a CSS class to format the question, enter in a known CSS class. For example, for a button, you can enter in “btn-success” to turn the button green.
Map to J1 Web Event Field: If you are associating the question/field with information in J1 Web Events, select the appropriate event field from the drop-down options.
This option is only available to schools with an J1 Web Events Management license. |
Map to Payment Field: From the drop-down, select the data you want to be available in the payment portlet.
Max Length: Enter in the maximum amount of characters you would like the user to be able to enter into the field.
Multiply Balance by Double Value: Select this checkbox if your question/field includes a value amount mapped to a selected Payment Profile, and you want to multiply the amount by the Fee Amount in the Payment Profile. * It is recommended that you use the Balance Calculator to modify the final balance as this setting will eventually be discontinued.
OR Enter Image URL
Read Only: Select this checkbox if you want the question/field to be shown to users, but unavailable to them to select from or update.
Required: Select this checkbox if you want to require users to complete the question/field.
Selected Date: Use this field ot select the date you want to appear in the datepicker question. Form users will be able to change this date.
Show Details Button
Show Update Button
Show Only in Report: Select this checkbox if you want to make a question/field only visible in the report view or FormFlow - Workflow.
Use ID Number Value to Override Submitter's ID: Select this checkbox if you want a user to submit the form as another user. For example, a faculty member wants to submit a major change form on behalf of their student. When this setting is defined, the Submitter ID will be overwritten with the ID Number in this question instead of the ID Number of the user submitting the form. This setting is only available for hidden fields.
Validation: From the drop-down, select a method to validate the user’s response to a question/field. For example, you can select the JZB – Zip Code validation to ensure the user enters a valid zip code.
Waiver Code Datasource: From the drop-down, choose the waiver code datasource. Waiver codes can be used when a payment is associated with your form and your school allows the fee to be waived in certain circumstances. For more information about setting up a waiver code data source, see the Data Source topic.
Width and Height: To adjust how wide or high the question/field appears, enter the size you want the button in the Width and Height fields. You can use the percentage of 100 or use px, pt values. For example, if you want the dropdown to be small, enter 50% or 50px.
Add a Rule to the Question/Field to Execute an Action
You can use actions to control if anything happens when the form user selects a particular option. For example, your form survey includes a radio button option asking form users to rate their level of satisfaction with the school's facility. If the form user selects Dissatisfied, you can show an additional essay question asking them to detail why.
Log in to the campus portal as an administrator and access J1 FormFlow - Forms.
Click Manage Forms. The Manage Forms page appears.
Click on the form you are working with.
Click on the tab you want to work with.
Right-click on the question/field and select Properties. The Edit Item window appears.
Click the Rules tab.
Click Add Step.
In the first drop-down, select the If answer value is condition. This tells FormFlow to execute the rule if the answer value matches the value you specify.
In the field to the right of the drop-down, enter the answer value that you want to trigger the rule to execute.
In the third drop-down, select the action you want to happen. Examples
To show the form user a message, select Alert: Show message. A blank field appears where you can enter text you want shown in a pop-up notification. This can be useful when you want to notify the form user about their choice.
To show or hide other form options based on what the forum user selected, use the group clear, hide, show, and toggle options. See Working with Grids for more information.
If you would like to add a rule that executes if the answer value the user enters is a different value:
Click Add Step.
Select Else if answer value is from the first drop-down option.
Enter the answer value in the field that you want to trigger the rule to execute.
From the section drop-down option, select the rule you would like to execute.
To include additional conditions before the action occurs:
Click Add Step.
Select Else from the first drop-down option. Selecting Else will execute the current rule if the previous rule did not execute based on the answer value provided.
From the second drop-down option, select a rule type to execute.
To have more than one action occur when the form user selects a particular option:
Click Add Step.
Select And from the first drop-down option. Selecting And will execute the current rule in addition to any other rule that is set to execute.
From the second drop-down option, select a rule type to execute.
Click Save.
For more information on using Rules for your form questions, see Rules.
Create a Stored Procedure for a Form
Log in to the campus portal as an administrator and access J1 FormFlow - Forms.
Click Manage Forms. The Manage Forms page appears.
Click on the name of the form you want to update. The form page appears.
From the Tools menu, select Stored Procedures. The Procedures page appears.
Click New Procedure.
From the Database drop-down, select the database from which the stored procedure is derived.
For multiple response questions, such as the Collection Grid, you can click New Multi-Response Procedure. This will tell the form to execute the procedure once FOR EACH response to the question.
From the This statement should be executed on drop-down, select
Submit occurs when the Event action Form: Submit is executed. All Save statements are executed automatically prior to the Submit statements being executed.
Save occurs when the Event action Form: Save is executed.
Workflow occurs upon receiving a command from the Workflow portlet. This command is sent when a document progresses from a stage that has the "Execute Statements" setting checked
From the Procedure drop-down, select the procedure to be executed. The table drop-down options appear. Example
Sample stored procedure
CREATE PROCEDURE dbo.AAA_spNameUpdateSubmission
@ID_NUM int,
@FIRST_NAME varchar(30),
@LAST_NAME varchar(30)
AS
BEGIN
SET NOCOUNT ON;
INSERT INTO AAA_NAME_UPDATES (ID_NUM, FIRST_NAME, LAST_NAME) VALUES (@ID_NUM, @FIRST_NAME, @LAST_NAME)
END
Procedures are created in SQL Server. |
From the parameter table drop-downs, select the form question you are mapping to the parameter or the following:
NULL will enter in a null value.
Custom Value is defined text that is always be inserted into the column.
Submission as PNG converts the final form submission into a PNG file and stores it as a byte array in the database. (This functionality is not supported for CX.)
Submission as PDF converts the final form submission into a PDF file and stores it as a byte array in the database. (This functionality is not supported for CX.)
Collection Grid: * values indicate the column in the collection grid that should be referenced when inserting into the field. These questions are "Source" questions. Collection Grid: Row Number is generated at submission time and represents the row order where the data exists in the user input.
Click Save.
Repeat steps 5 - 10 to create as many stored procedures as needed.
Click Done.
Set up Static Options for the Question
Static options are ones you enter on the form. They do not use data sources or vary.
Dynamic options are based on data sources and queries set up to select information from your external database. They can vary according to the form user, information, etc.
Log in to the campus portal as an administrator and access J1 FormFlow - Forms.
Click Manage Forms. The Manage Forms page appears.
Click on the form you want to work with, then click on the tab you want to work with.
Right-click on the checkbox question and select Properties. The Edit Item window appears.
Click on the Options tab.
From the Orientation drop-down, select vertical or horizontal to determine how you want the checkboxes to appear on the form.
Select the Static Options option.
If you want the options to be randomized, select the Randomize Options check box.
Click Add Option.
If the checkboxes impact a final balance on the form, use the Dbl Value field to enter the numeric amount used in the balance calculator.
Use the Value field to enter the value that will be stored in the database and displayed in the email/report.
In the Text field, enter how the checkbox option will appear to the form user.
If you want a particular option to be automatically selected when the form user first accesses the form, select the Selected check box.
Repeat steps 9 - 13 to add as many checkboxes as needed.
Click Save.
Set up Dynamic Options for the Question
Static options are ones you enter on the form. They do not use data sources or vary.
Dynamic options are based on data sources and queries set up to select information from your external database. They can vary according to the form user, information, etc.
Log in to the campus portal as an administrator and access J1 FormFlow - Forms.
Click Manage Forms. The Manage Forms page appears.
Click on the form you want to work with, then click on the tab you want to work with.
Right-click on the checkbox question and select Properties. The Edit Item window appears.
Click on the Options tab.
From the Orientation drop-down, select vertical or horizontal to determine how you want the checkboxes to appear on the form.
Select the Dynamic Options option.
From the Options Source drop-down, select the datasource you want to use to populate the checkbox options available for the form user to select from.
JZB indicates a Jenzabar-provided datasources. You can also select from datasources your school has set up using the datasources options. |
Click Save.
Set up Cascading Options for the Question
A data source for cascading options must be created before you can utilize this functionality. For more information on data sources, see the Related Topics section of this page for a link to the Data Sources topic.
Log in to the campus portal as an administrator and access J1 FormFlow - Forms.
Click Manage Forms. The Manage Forms page appears.
Click on the form you are working with.
Click on the tab you want to work with.
Right-click on the drop-down, radio button or checkbox question you are associating the data source with and select Properties. The Edit Item window appears.
Click the Options tab.
Select Dynamic Options.
From the Options Source drop-down, select the auto-complete data source you created.
A drop-down for the placeholder appears. Select the question you wish to map to the placeholder defined in the query.
The placeholder was determined in the SQL query added to the cascading option data source. |
Click Save changes.
Create a Collection Grid on a Form
Log in to the campus portal as an administrator and access J1 FormFlow - Forms.
Click Manage Forms. The Manage Forms page appears.
Click on the name of the form you want to update. The Form page appears.
From the Tools menu, select Stored Procedures. The Procedures page appears.
Click New Procedure. (For multiple response questions, such as the Collection Grid, you can click New Multi-Response Procedure. This will tell the form to execute the procedure once FOR EACH response to the question.)
From the This statement should be executed on drop-down, select one of the following:
Submit occurs when the Event action Form: Submit is executed. All Save statements are executed automatically prior to the Submit statements being executed.
Save occurs when the Event action Form: Save is executed.
Workflow occurs upon receiving a command from the Workflow portlet. This command is sent when a document progresses from a stage that has the Execute Statements setting selected.
From the Procedure drop-down, select the stored procedure you want to execute. The table drop-down options appear. Example
Sample stored procedure
CREATE PROCEDURE dbo.AAA_spNameUpdateSubmission
@ID_NUM int,
@FIRST_NAME varchar(30),
@LAST_NAME varchar(30)
AS
BEGIN
SET NOCOUNT ON;
INSERT INTO AAA_NAME_UPDATES (ID_NUM, FIRST_NAME, LAST_NAME) VALUES (@ID_NUM, @FIRST_NAME, @LAST_NAME)
END
Procedures are created in SQL Server. |
From the parameter table drop-downs, select the form question you are mapping to the parameter or the following:
Collection Grid: * values indicate the column in the collection grid that should be referenced when inserting into the field. These questions are "Source" questions. Collection Grid: Row Number is generated at submission time and represents the row order where the data exists in the user input.
Click Save.
Click Done.
Add an Auto-Complete to the Textbox
An auto-complete suggests options the form user can select from as they enter their response. For example, the form user starts typing their intended field of study. As they start typing English, English Literature, English Writing, English Business Writing options from your database appear.
Users are not limited to the auto-complete options.
Displays a list of courses matching the course code states the user starts entering from the J1 database
SELECT RTRIM(CRS_CDE) + ' - ' + RTRIM(SHORT_CRS_TITLE_1), RTRIM(CRS_CDE)
FROMCATALOG_MASTER
WHERE ACTIVE_INACTIVE_ST = 'A'
Log in to the campus portal as an administrator and access J1 FormFlow - Forms.
Click Manage Forms. The Manage Forms page appears.
Click Site Administrators. The Site Administrators page appears.
Click Data Sources. The Data Source page appears.
Click the Add icon.
In the Name field, enter a name for the datasource you want to create.
From the Use Database drop-down, select the database you want to pull the data from. This could your J1 database or another external database you are using with J1 FormFlow - Forms.
In the DataSource Query field, enter your SQL query that will select and/or filter the information in your database that you want to make available in your form.
Click Save DataSource.
Click Manage Forms. The Manage Forms page appears.
Click on the form you are working with.
Click on the tab you want to work with.
Right-click on the textbox question you are associating the datasource with and select Properties. The Edit Item window appears.
Click the Options tab.
Select Dynamic Options.
From the Options Source drop-down, select the data source you created.
Click Save.
Navigation buttons can help your form user step through your form. You can add Previous and Next buttons to each tab that will save and update the form user's progress.
Log in to the campus portal as an administrator and access J1 FormFlow - Forms.
Click on the form you are working with.
Click Add Question. The Add Item window appears.
In the Unique ID field, enter an identifier for the button.
From the Type drop-down pick list, select Button.
In the Text field, enter and format the label you want to use to describe the button. For example, Next.
If you are grouping fields, enter the group name in the Group field. Each question being included in the group must have the same group name in this field.
Click the Settings tab.
The question is automatically aligned to the left of the form page. Use the Alignment options to move it to the center or right.
Click the Rules tab.
Click Add Step.
In the first drop-down, select If answer value is and in the corresponding effect field, enter *.
In the second drop-down, select Tab: Change and the corresponding effect drop-down, select one of the following options:
Select the name of the tab the user will be directed to.
Select Next tab to take the user to the next tab.
Select Previous tab to take the user to the previous tab.
Click Add Step.
In the first drop-down, select And.
In the drop-down, select Form: Save.
Click Save changes.
A Submit button can be configured to save your user's submission, send the submission to Workflow, send the user to the payment portlet to complete a payment, or send the submitter a confirmation email.
Log in to the campus portal as an administrator and access J1 FormFlow - Forms.
Click on the form you are working with.
Click Add Question. The Add Item window appears.
In the Unique ID field, enter an identifier for the button.
From the Type drop-down pick list, select Button.
In the Text field, enter the label for the button. For example, Submit.
Click the Settings tab.
The question is automatically aligned to the left of the form page. Use the Alignment options to move it to the center or right.
Click the Rules tab.
Click Add Step.
In the first drop-down, select If answer value is and in the corresponding effect field, enter *.
Because buttons don't allow users to choose a value, this field should always be *. |
In the second drop-down, select Form: Submit.
Click Add Step.
In the first drop-down, select And.
There are several options:
To send the submitter through the online payment process, select Payment: User Profile from the first drop-down option and the appropriate payment profile from the second drop-down.
Only the online profiles you have set up are available. See the Payment Profile topic for more information. |
To send the form through the approval process, select Workflow: Use Approval Track from the first drop-down option and the workflow process you want to use from the second drop-down.
Only the workflow approval tracks you have set up are available. |
To send the submitter a confirmation or notification email, select Email: Send and from the drop-down option select an email template to be used. To create a new email template, click the Add icon. To update the existing email template, click the Edit icon. See Working with Email Templates for more information.
To show the submitter a message, select Alert: Show message. A blank field appears where you can enter text you want shown in a pop-up notification.
Repeat steps 13 - 15 to add as many actions you want to occur when the user clicks the button.
Click Save changes.
A Save and Quit button works in conjunction with allowing form submitters to create a temporary account so they can save their work on a form and return to complete it at another time.
Log in to the campus portal as an administrator and access J1 FormFlow - Forms.
Click on the form you are working with.
Click Add Question. The Add Item window appears.
In the Unique ID field, enter an identifier for the button.
From the Type drop-down pick list, select Button.
In the Text field, enter the label for the button. For example, Save and Quit.
Click the Settings tab.
The question is automatically aligned to the left of the form page. Use the Alignment options to move it to the center or right.
Click the Rules tab.
Click Add Step.
In the first drop-down, select If answer value is and in the corresponding effect field, enter *.
In the second drop-down, select Form: Quit.
Click Add Step.
In the first drop-down, select And.
In the second drop-down, select Form: Save.
Click Save changes.
Send a Submission to a Workflow Track upon Clicking Submit
Log in to the campus portal as an administrator and access J1 FormFlow - Forms.
Click on the form you are working with.
Click Add Question. The Add Item window appears.
In the Unique ID field, enter an identifier for the button.
From the Type drop-down pick list, select Button.
In the Text field, enter the label for the button. For example, Submit.
Click the Settings tab.
The question is automatically aligned to the left of the form page. Use the Alignment options to move it to the center or right.
Click the Rules tab.
Click Add Step.
In the first drop-down, select If answer value is and in the corresponding effect field, enter *.
In the second drop-down, select Form: Submit.
Click Add Step.
In the first drop-down, select And.
To send a submission through more than one or different tracks when varying conditions are met, use the Workflow: Add to track queue and Workflow: Remove from track queue options.
Workflow: Add to track queue sends the submission to the selected track when the specified conditions are met. Once selected, you can select the appropriate workflow track from the drop-down that appears.
Workflow: Remove from track queue removes the submission from a selected track when the specified conditions are met. Once selected, you can select the appropriate workflow track from the drop-down that appears.
![]() |
Only the workflow approval tracks you have set up are available. |
To send a submission through a single workflow track, select Workflow: Set track and from the drop-down that appears, select the workflow track you want to send the submission to. Do not select this option if you want to send a submission through more than one track.
Click Save changes.