Several portlets allow the user to create custom reports that the user can see from within the portlet. During installation, several reports (InfoMaker .pbl files) are copied into default directories on the web server that these portlets access. You should update the location of the customized reports for the My Student Information portlet.
Perform the following steps to configure EX to support this portlet.
1. Open the UI Configuration window.
2. From the Category Name drop-down list,
a. Choose AccountsReceivable.
i. Enter the appropriate values for the configuration items listed. These items are used for the Course and Fee Statement, which is accessed via the My Student Information portlet. Right-click on the row to see an explanation of each item.
ii. Click the Save button.
b. Choose offline_payment.

i. Enter the appropriate values for the configuration items listed. These items are used for payments made through JICS. Right-click on the row to see an explanation of the item.
ii. Click the Save button.
c. Choose online_payment.
i. Enter the appropriate values for the configuration items listed. These items are used for payments made through JICS. Right-click on the row to see an explanation of the item.
ii. Click the Save button.
Configuration settings in JICS can be done by roles with permission to access and administer global and portlet settings.
If you are an administrator and need help in setting up and configuring this portlet, see the Configuration Guides on MyJenzabar.
See the Setting Global Permissions to Portlets help topic for instructions on how to set up global operations for JICS portlets.
1. Log in as the JICS administrator.
2. From the My Student Information portlet, click the Setup menu option.
The Portal Settings page appears.
a. Select the Should users be able to view data that is preliminary/unposted? check box if users can see just the posted transactions and if they can view unposted and/or preliminary transactions from EX.
b. In the Recalculation in progress message text box, enter the message to display to users when account data is not available because EX Business Office is performing a recalculation of their account balances.
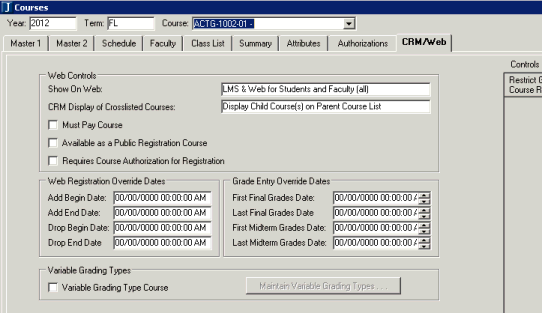
c. Select the Pay Must Pay Courses check box if your school wants to use the Must Pay Course process for selected courses. If you select the Pay Must Pay Courses check box and if you have Must Pay Courses that have not been paid, the Pay Must Pay Courses link will be available.
d. Select the Display Grand Total check box if your school wants the grand total of the account to appear on the My Account Balances page.
e. Click the Save button.