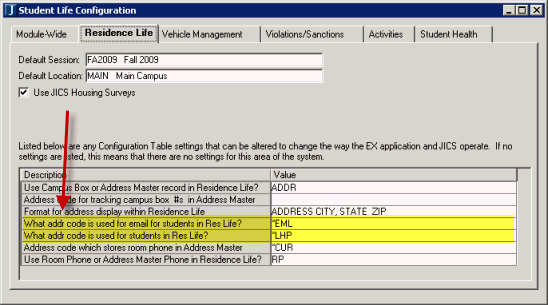
1. Open the Student Life Configuration window.
a. Click the Residence Info tab.
b. Locate the Configuration Table row of What addr code is used for email for students in Res Life? The default Value is *EML. Enter the address code you wish the survey to use for email messages for students in Residence Life.
c. Locate the Configuration Table row of What addr code is used for students in Res Life? The default Value is *LHP. Enter the address code you wish the survey to use for students in Residence Life.
d. Save.
2. Open the Session Definition window.

a. Select the Show on Web check box for all defined sessions to be displayed in JICS.
b. Save.
Configuration settings in JICS can be done by roles with permission to access and administer global and portlet settings.
If you are an administrator and need help in setting up and configuring this portlet, see the Configuration Guides on MyJenzabar.
See the Setting Global Permissions to Portlets help topic for instructions on how to set up global operations for JICS portlets.
1. Log in as the JICS administrator.
2. From the My Residence Information portlet, click the wrench icon ().
3. On the Customize Portlet Residence Information page, click the Settings tab.
4. In the Residence Information Student Life Term drop-down pick list, select the default Year and Term (Session) for which residence information for the student will be displayed. Note that this will only affect this instance of the My Residence Information portlet. All other places where the My Residence Information portlet appears will not use the same settings.
5. Click the Save button.
6. Click the Exit button.